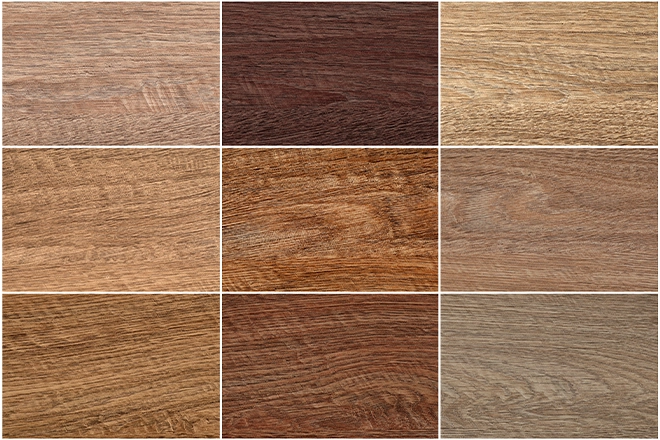
Different wood species respond uniquely to stain colors, and choosing the right one can make a major difference in how well the natural beauty and grain patterns show through. In wholesale flooring environments, each type of wood carries its own personality, which affects how deeply it absorbs color and how clearly its texture appears after finishing.
Did you know the same stain can look completely different depending on the wood? A shade that feels warm and rich on one species may turn dull on another or barely show on darker woods. Understanding how each wood type accepts stain and reveals color helps prevent costly mistakes and ensures a clean, professional result. Every species has its own traits that either support or resist certain finishes, making careful selection essential for beautiful floors, furniture, and cabinetry.
Understanding Wood and Stain Compatibility
Wood and stain compatibility determines whether your project looks professionally finished or amateurish. Each wood species absorbs stain differently based on density, grain pattern, and natural color undertones.
Why Wood Type Matters for Stain Choice
Wood type directly affects stain color appearance because different species have varying porosity levels and natural pigments. Dense hardwoods like maple resist stain absorption while porous softwoods like pine absorb unevenly.
The wood’s natural undertones interact with stain pigments. Yellow-toned woods like oak warm up red stains significantly. Gray-toned woods like ash cool down brown stains noticeably.
Grain patterns also influence results:
- Open-grain woods (oak, ash) show dramatic color variation between grain and flat areas
- Tight-grain woods (maple, cherry) display more uniform coloring
- Mixed-grain woods (pine, fir) create unpredictable patterns without proper preparation
Matching stain chemistry to wood characteristics prevents blotching, uneven color, and disappointing results. Professional finishers always consider wood type before selecting stain colors.
Most Popular Stain Colors
Popular stain colors range from natural tones that enhance wood’s inherent beauty to dramatic shades that transform appearance completely. Understanding color categories helps narrow choices effectively.
Natural and Light Stains:
- Clear/Natural: Enhances grain without changing color
- Honey/Golden Oak: Adds warmth while maintaining brightness
- Provincial: Soft brown with subtle warmth
Medium Brown Stains:
- Special Walnut: Classic medium brown with slight red undertones
- Early American: Warm traditional brown
- Weathered Oak: Modern gray-brown blend
Dark Stains:
- Jacobean: Rich dark brown without black overtones
- Dark Walnut: Deep chocolate brown
- Ebony/Black: Dramatic near-black finish
Specialty Colors:
- Gray tones: Contemporary cool finish
- White/Pickled: Scandinavian-inspired look
- Red/Cherry tones: Traditional warm finish
Pro Tip:
Stain manufacturers use inconsistent naming across brands. Always test actual samples rather than relying on color names alone.
Key Factors Affecting Stain Color Results
Several factors beyond stain color choice dramatically impact final appearance. Understanding these variables ensures consistent, professional results across your entire project.
Wood Grain and Porosity
Wood grain and porosity create the foundation for how stain appears on finished surfaces. Porous woods with open grain patterns absorb significantly more stain than dense, tight-grained species.
- Open-grain woods like oak, ash, and mahogany display pronounced color variation. The porous grain lines absorb deep color while flat areas remain lighter, creating dramatic contrast that enhances natural patterns.
- Closed-grain woods like maple, birch, and cherry resist stain penetration. These species require longer application times and may need multiple coats to achieve the desired color depth.
- Softwoods present unique challenges. Pine, fir, and cedar contain both hard and soft growth rings that absorb stain at different rates, creating a blotchy appearance without proper preparation using wood conditioner.
Natural Undertones of Wood Species
Natural undertones significantly influence final stain color by mixing with applied pigments. Every wood species has inherent coloring that combines with stain rather than disappearing beneath it.
Wood undertone categories include:
- Warm yellows: Red oak, pine, poplar
- Cool grays: White oak, ash, beech
- Pink-reds: Cherry, alder
- Golden-browns: Teak, walnut, hickory
Warm undertones shift brown stains toward orange or red. Cool undertones create muddy appearances with red stains. Pink undertones intensify red-based stains dramatically while graying out brown tones.
Consider undertone interaction when selecting colors. Red-toned cherry wood rarely needs red stain additions. Yellow-toned oak benefits from cool brown stains that balance warmth.
Oil-Based vs Water-Based Stains
Oil-based and water-based stains produce distinctly different results on identical wood species. Each formulation type offers specific advantages and challenges for color achievement.
Oil-Based Stains:
- Deeper color penetration
- Longer working time for even application
- Enhanced grain definition
- Warmer, amber-toned finish
- Stronger odor and longer drying time
Water-Based Stains:
- Clearer colors without an amber cast
- Faster drying between coats
- Lower VOC emissions
- Grain raising requires additional sanding
- More difficult even application
Fact:
Oil-based stains naturally add amber warmth that shifts cool gray stains toward tan. Water-based versions maintain true gray tones but may appear washed out on naturally warm woods. This difference explains why test samples sometimes look nothing like finished projects.
Best Stain Colors by Wood Species
Selecting stain colors matched to specific wood species ensures results that highlight natural characteristics beautifully. Each species responds uniquely to various stain tones based on density, grain, and undertones.
Oak (Red and White)
Oak accepts stains exceptionally well due to the prominent open grain that creates beautiful color variation. Red oak has warm yellow undertones while white oak shows cooler gray tones.
Popular stains for oak:
- Golden Oak: Enhances natural warmth without excessive darkness
- Jacobean: Deep, rich brown that emphasizes grain dramatically
- Natural/Clear: Allows oak’s character to shine with minimal color addition
Red oak pairs beautifully with medium to dark browns. The yellow undertones prevent muddiness while creating rich, traditional appearances. White oak handles gray stains better than red oak due to cooler natural coloring. While special Walnut and Provincial create classic looks on both oak types. Darker stains like Ebony create dramatic modern finishes but may hide oak’s beautiful grain patterns.
Pine
Pine requires careful stain selection and preparation due to uneven density between growth rings. Without wood conditioner, pine absorbs stain blotchily regardless of color choice.
Popular stains for pine:
- Golden Pecan: Warm tone that complements pine’s natural yellow
- Simply White/Pickled: Scandinavian-inspired brightness
- Dark Walnut: Creates rustic contrast when blotching is desired effect
Light to medium stains work best on conditioned pine. These colors enhance grain without emphasizing uneven absorption. Very dark stains either create intentional rustic character or frustrating blotchiness, depending on application technique.
Pro Tip:
- Always apply pre-stain wood conditioner on pine before any color application. This crucial step equalizes absorption rates across hard and soft grain areas.
- Test pine stains on scrap with an identical grain pattern to your project piece. Pine varies significantly even within single boards, so testing near the application area provides an accurate preview.
Maple
Maple’s dense, tight grain resists stain absorption, creating challenges for achieving deep colors. This characteristic makes maple ideal for lighter finishes that showcase a smooth, uniform surface.
Popular stains for maple:
- Light stains: Natural, Honey, Golden Oak provide clarity and brightness
- Warm browns: Special Walnut, Early American add richness without muddiness
Light stains display maple’s smooth grain beautifully while avoiding blotching. The tight pores create glass-like surfaces when finished properly with clear or barely-tinted stains.
Medium browns work when applied with gel stains that sit on the surface rather than penetrating deeply. Traditional liquid stains may appear uneven on maple without careful technique. However, dark stains on maple risk a blotchy appearance despite careful application. If dark maple is desired, multiple thin coats or gel stain formulations provide better control than single heavy applications.
Cherry
Cherry wood darkens naturally over time with light exposure, starting pink-red and maturing to rich reddish-brown. Stain choices should account for this continuing color development.
Popular stains for cherry:
- Rich reds: Enhance natural pink tones immediately
- Natural finishes: Clear coats allow gradual darkening without added color
Light stains on cherry provide minimal initial impact but allow the wood’s natural beauty to develop fully. Many woodworkers prefer clear finishes that protect while letting cherry’s color evolution progress naturally.
Red-toned stains intensify cherry’s inherent pink coloring immediately. These create warm, traditional appearances but may darken excessively as the wood ages. On the other hand, brown stains can muddy the cherry’s natural beauty. If brown tones are desired, cool-toned stains without red pigments work better than warm browns that clash with cherry’s undertones.
Walnut
Walnut’s naturally dark chocolate coloring requires minimal staining in most applications. Clear finishes often suffice to protect while showcasing walnut’s inherent richness.
Popular stains for walnut:
- Dark brown: Deepens existing color slightly
- Ebony: Creates a near-black finish for dramatic effect
- Espresso: Rich darkness with subtle red undertones
Natural or clear finishes bring out walnut’s beautiful grain and rich color variations, allowing the wood’s inherent beauty to shine without the need for added pigments. Dark stains can create a deep, uniform black when extreme contrast is desired, but this approach masks the natural character that makes walnut so valuable. Lighter stains, on the other hand, are often ineffective on walnut’s dark base. Achieving a lighter tone usually requires bleaching first, which removes much of the natural color that gives walnut its unique appeal.
Exotic Woods (Mahogany, Hickory, etc.)
Exotic wood species have unique characteristics requiring careful stain selection. These premium wholesale flooring materials deserve stain choices that enhance rather than obscure their distinctive appearance.
Mahogany:
- Natural reddish-brown tones need minimal staining
- Red-toned stains intensify warmth
- Clear finishes protect while showcasing grain
Hickory:
- Extreme color variation between heartwood and sapwood
- Medium browns unify the appearance
- Natural finishes celebrate dramatic contrast
Teak:
- Natural golden-brown rarely needs staining
- Oil finishes enhance without color addition
- Stains often appear muddy on teak’s natural oils
Quick Tip:
Exotic woods cost significantly more than domestic species. Test stains extensively before applying to expensive materials. Many exotic woods look best with simple oil or clear finishes that protect without altering appearance.
How to Test and Match Stains for Wood Projects
Testing stains before full project application prevents expensive mistakes and ensures satisfaction with final results. Professional finishers always test multiple options on actual project wood.
Sampling on Scrap Wood
Sampling on scrap wood from your actual project provides accurate color previews. Store-bought samples or different wood species don’t show how the stain performs on your specific material.
Cut test pieces from project wood, not random scraps. Wood characteristics vary significantly between boards, ages, and storage conditions. Testing on similar material ensures reliable results.
Sand test pieces to the same grit as your project surface. Rougher surfaces absorb more stain and appear darker. Smoother finishes show lighter coloring with more grain clarity.
Apply stain following the manufacturer’s instructions exactly:
- Use the same application method (brush, rag, spray)
- Match dwell time before wiping
- Apply an identical number of coats
- Include topcoat in test samples
Let samples dry completely before judging. A wet stain always appears darker than the dried finish. Most stains require 24-48 hours for true color development.
Using Color Charts and Swatches
Color charts and swatches are useful starting points for selecting a stain, but they can never replace testing on actual wood. Manufacturer charts show how stains appear on standardized samples, offering general guidance, yet your own wood’s unique grain, undertones, and species will affect the final result. Most charts use white oak or maple, so red oak, pine, or cherry will often look noticeably different.
Bringing swatches into your project space lets you see how the color changes under natural daylight, incandescent bulbs, or LED lighting. It’s also important to consider these factors to create a harmonious, professional finish:
- Surrounding colors
- Flooring stains should complement or intentionally contrast with the walls
- Furniture and existing woodwork
Mixing Custom Stain Colors
Mixing custom stain colors allows precise color matching when standard options don’t achieve desired results. This advanced technique requires careful measurement and thorough testing.
Start with the base stain closest to the target color. Add small amounts of complementary colors until achieving the desired tone. Always measure additions precisely for repeatability across the entire project.
Common mixing strategies include:
- Warming cool browns by adding red-toned stains
- Cooling warm browns by adding gray-toned stains
- Adjusting darkness by mixing lighter and darker versions
- Creating unique tones by blending completely different colors
Mix enough custom stains for the entire project, plus extra. Matching custom colors later proves nearly impossible, even with careful records.
Test mixed stains extensively on the project wood. Custom combinations may react unpredictably with different wood species compared to commercial formulations.
Common Mistakes and Pro Tips for Choosing Stains
Avoiding common staining mistakes saves time, money, and frustration. Professional techniques ensure consistently beautiful results.
Overcoming Uneven Absorption
Uneven absorption creates blotchy finishes, even when the color choice was correct. Wood conditioner prevents this problem effectively.
Key prevention steps:
- Apply pre-stain conditioner on softwoods and porous hardwoods
- Sand to consistent grit across the entire project
- Raise and sand grain before water-based stain application
- Use the identical technique across all surfaces
Achieving Consistent Color Across Surfaces
Consistent color requires a systematic approach and quality materials. Variation between sections looks unprofessional.
Essential consistency tips:
- Purchase all stains from a single batch
- Stir thoroughly and frequently during application
- Maintain consistent temperature and humidity
- Complete entire sections without stopping
Finishing and Maintenance Advice
Topcoats protect stain colors while influencing final appearance. Oil-based polyurethane adds amber warmth while water-based versions maintain true color. Apply multiple thin layers rather than thick coats for best results.
Quick maintenance tips:
- Remove dust regularly with microfiber materials
- Clean spills immediately
- Avoid harsh chemicals
- Recoat periodically based on wear
Consider traffic patterns when selecting stain colors for wholesale flooring projects. Darker stains hide wear better while lighter colors brighten spaces.
Conclusion
Choosing the right stain color starts with understanding how each wood species reacts to pigment, grain, and finish chemistry. Testing on your actual project wood is the simplest way to avoid surprises and get results you are genuinely happy with. When these pieces line up, including wood type, stain choice, and application technique, you end up with a finish that looks intentional and professionally done.
If you ever want a second opinion or need the right materials for the job, the team at Rustic Wood Floor Supply is known for guiding people toward the right choices without making the process complicated. Their experience with everything from oak to exotic hardwoods makes them a steady resource when you want a clean, even finish that lasts.
FAQs
Does the type of wood affect how a stain color looks?
Yes, the same stain color can look very different depending on the wood species. Each type absorbs and reflects stain uniquely based on its grain pattern, density, and natural undertones.
What stain colors work best for oak wood?
Golden oak, walnut, and darker brown stains are commonly recommended for oak since they highlight its open grain. These colors provide rich, classic looks that enhance oak’s natural character beautifully.
Which stains suit pine or other softwoods?
Lighter stains like golden pecan or white stains show the pine’s grain effectively. Using wood conditioner first helps prevent blotchiness and avoid very dark stains unless you want intentional rustic effects.
What is a good stain color for maple or birch?
Maple and birch accept both light and dark stains, but darker tones need gel formulas or a few thin, controlled coats to avoid blotching. Light stains give a clean, modern look, while deeper shades add contrast when applied with care.
How do I pick a stain color that matches my décor?
Choose a stain that complements your room’s color scheme and undertones carefully. Warm stains like cherry or mahogany suit warm-toned rooms, while greys or ash stains work better for modern, cool-toned spaces.
Should I test stain colors before finishing my project?
Always test stain colors on scrap or hidden areas of your actual project wood before full application. This ensures you like the final look and prevents expensive disappointment with permanent color choices.